Odoo Getting Started
Odoo is a suite of web based open source business apps.The main Odoo Apps include an Open Source CRM, Website Builder, eCommerce, Warehouse Management, Project Management, Billing & Accounting, Point of Sale, Human Resources, Marketing, Manufacturing, Purchase Management,Odoo Apps can be used as stand-alone applications, but they also integrate seamlessly so you get a full-featured Open Source ERP when you install several Apps.

If you have installed Websoft9 Odoo, the following steps is for your quick start
Preparation
- Get the Internet IP of your Server on Cloud
- Check your Inbound of Security Group Rule of Cloud Console to ensure the TCP:80 is allowed
- Complete Five steps for Domain if you want to use Domain for Odoo
- Get default username and password of Odoo
Odoo Initialization
Steps for you
- Using local Chrome or Firefox to visit the URL http://domain name or http://Internet IP, you will enter installation wizard of Odoo
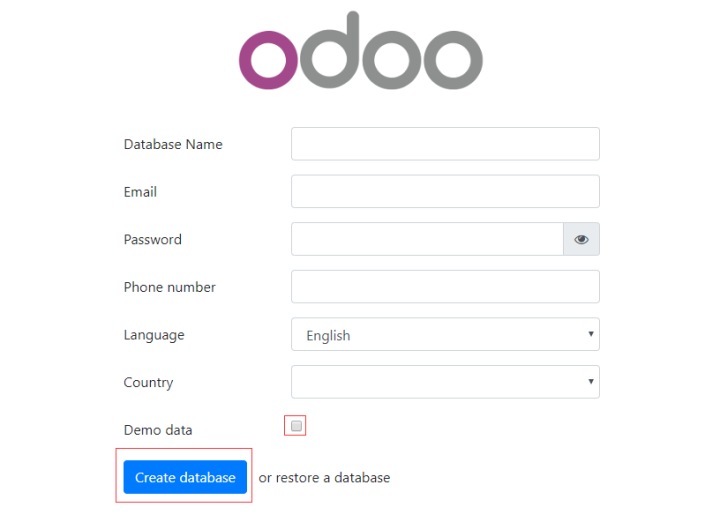
2.Fill in all items, then click create database button to start create one Company's database
The Email and Password is credentials for log in to Odoo
-
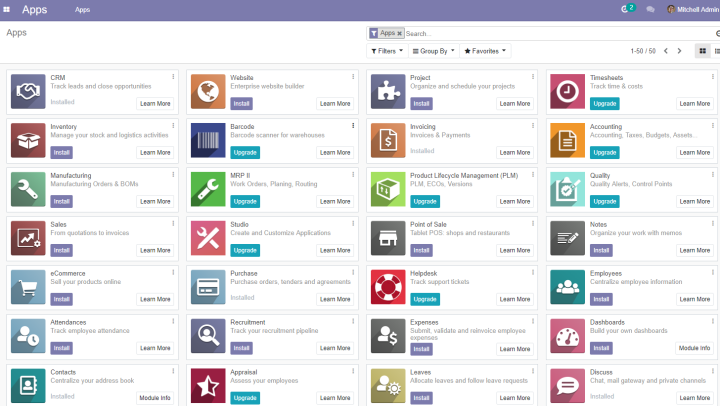
After the create database is complete, log in to the Odoo Console and install the apps your required.
-
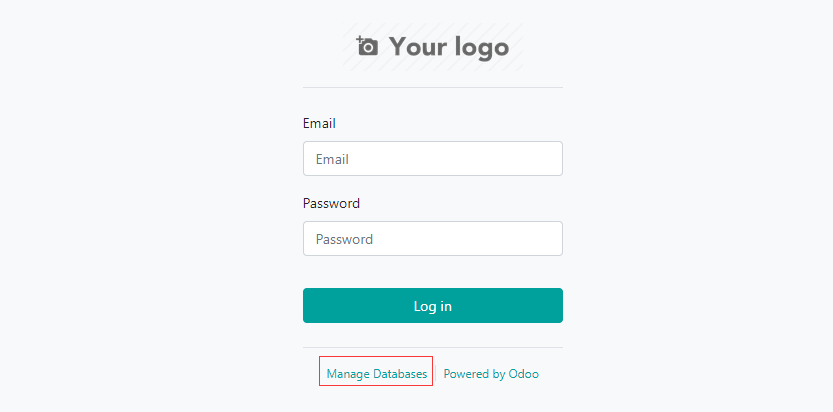
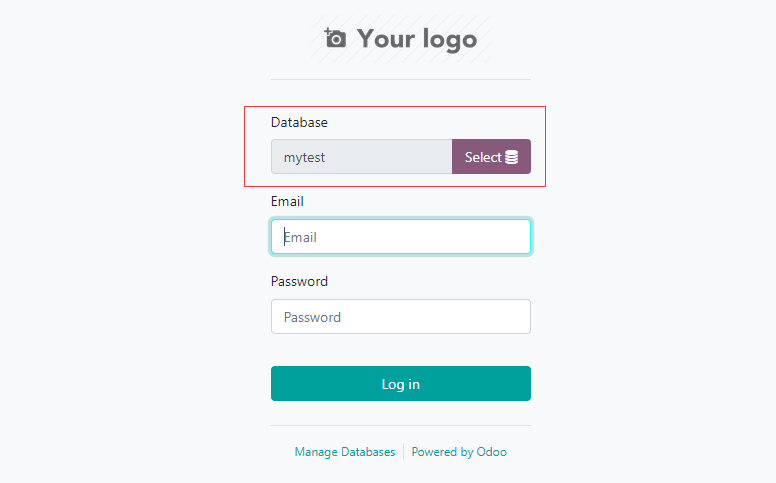
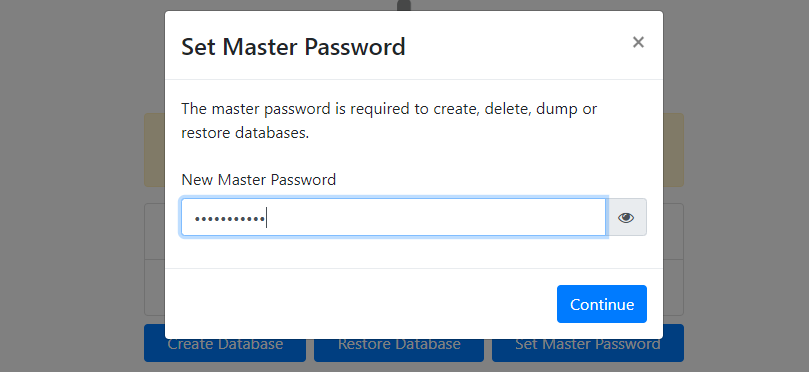
Log out, click the Manage Database in the log in page of Odoo
-
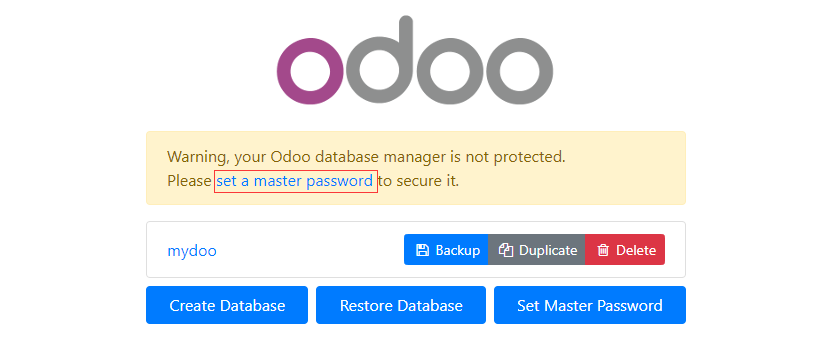
Click the set a master password to set a management password for Odoo's databases(very important)
-
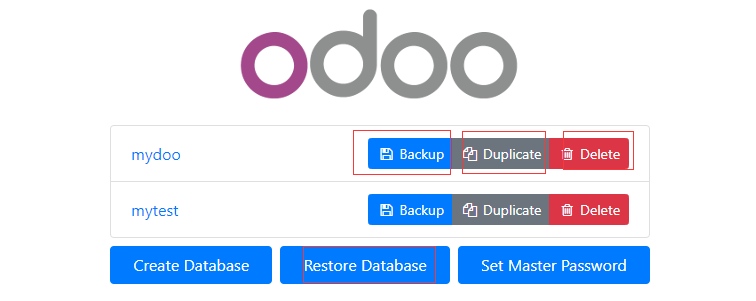
Odoo Support for multi-enterprise, so you can create database again for creating new company
-
Return to log in page, you can see a new database listed for log in
More useful Odoo guide, please refer to Odoo Documentation
Having trouble?
Below is for you to solve problem, and you can contact Websoft9 Support or refer to Troubleshoot + FAQ to get more.
Check the Demo data, can you delete the data later?
Their no tools for you to delete Demo data. It is recommended to delete the database directly and then add it again (the Demo data is no longer checked)
Odoo QuickStart
The following uses Odoo to build enterprise ERP as a task to help users get started quickly:
To learn more about the use of Odoo, please refer to the official documentation: Odoo Documentation
Odoo Setup
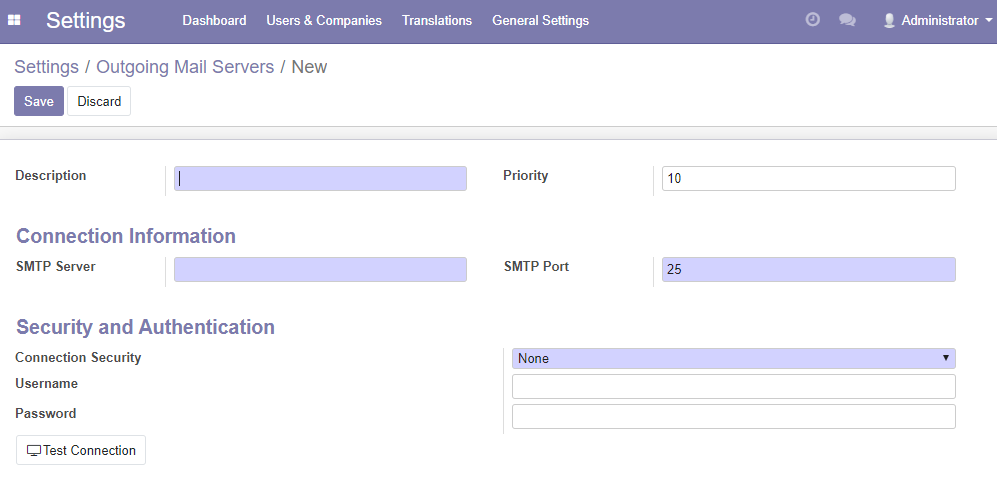
Configure SMTP
-
Get SMTP related parameters in the mailbox management console
-
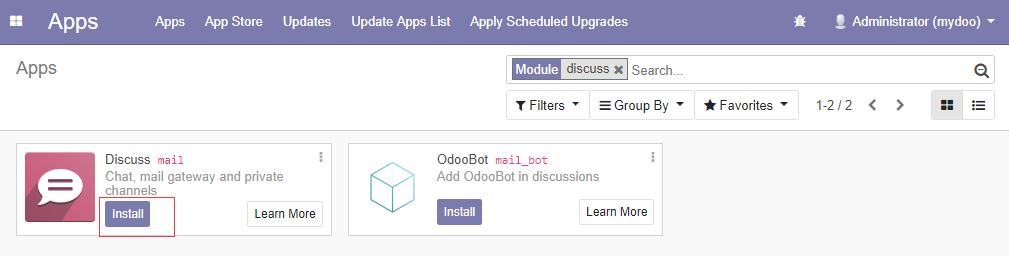
Log in to the Odoo Console, intall the Discuss module that SMTP need
-
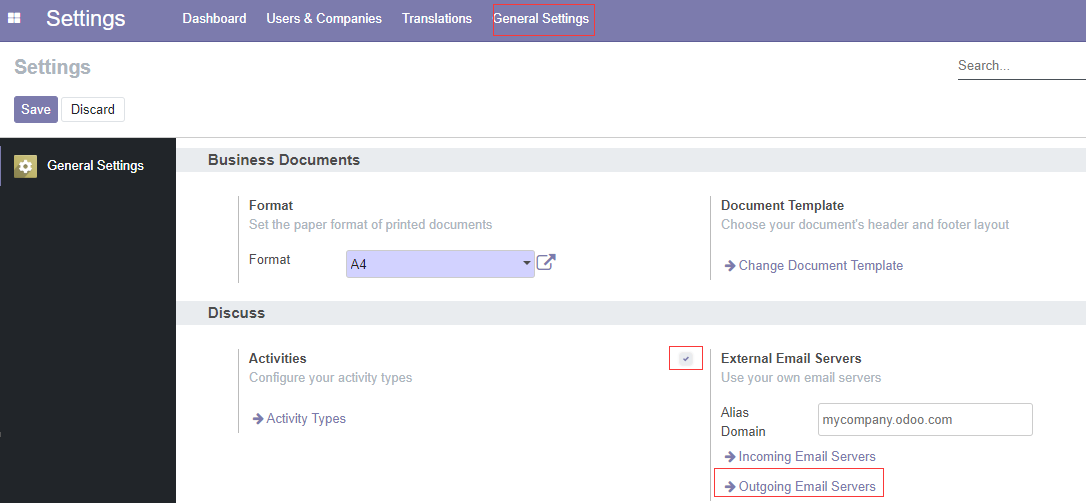
Open Settings > General Settings > Discuss to start configure SMTP
-
Fill in the SMTP parameters
Odoo 15
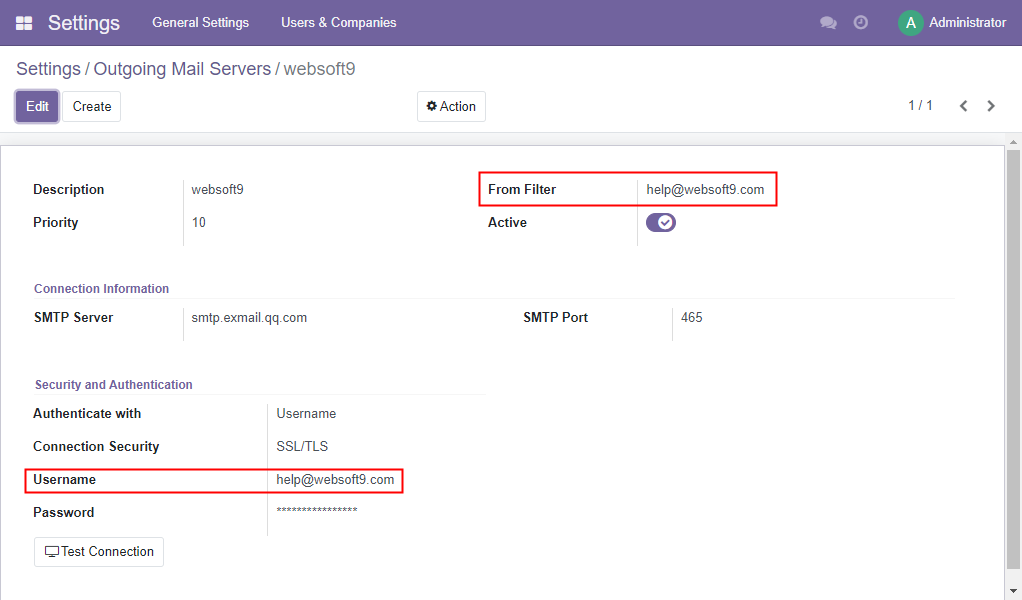
-
Click the Test Connection
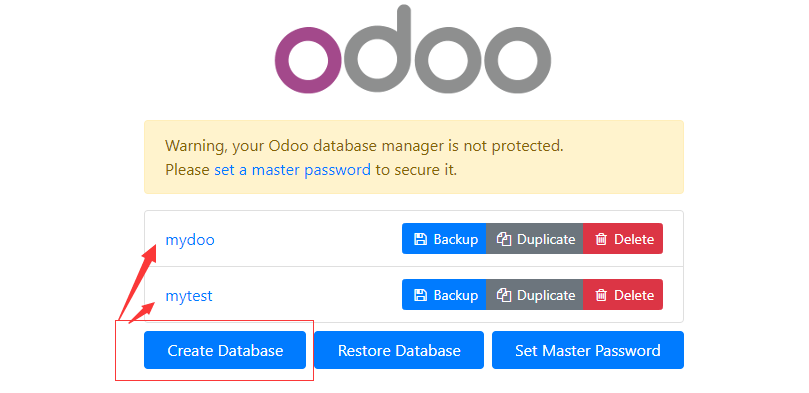
Database Manager
Odoo comes with a database manager, refer to:
-
Click the [Manage Database] link on the Odoo login interface
-
Click [set a master password] to set a master password for the database to protect the database (very important)
-
Set a password
-
Select the action item to manage the database
NEW
Odoo supports multi-tenancy (multi-enterprise organization), adding a database is equivalent to adding an enterprise.
Multiple companies use a set of Odoo together, log in with different accounts, and do not interfere with each other.
-
Click [create database], enter the password, and set the name
-
After the addition is complete, you will see the new database listed in the database management interface
Backup
-
Enter the password, select the backup format, and click [Backup]
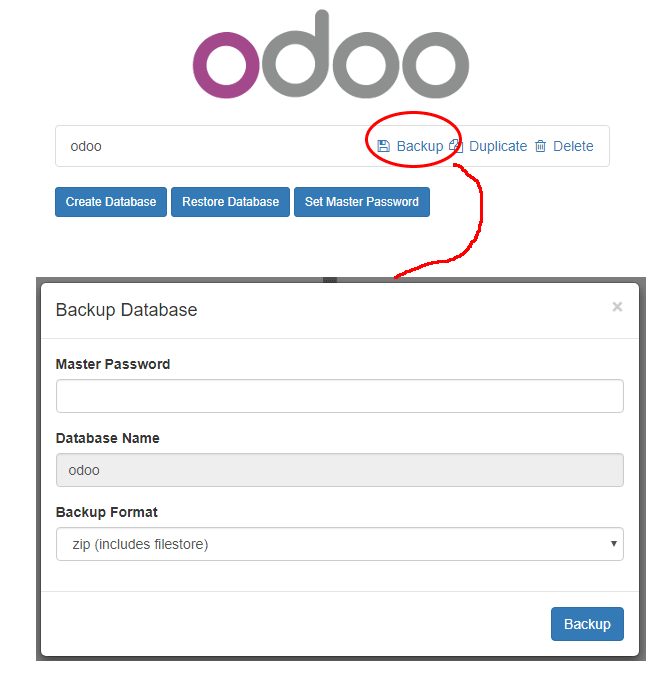
-
After the backup is completed, the system will automatically download the backup data (zip file)
copy
An enterprise organization can be completely copied as the data of the new enterprise organization
-
Enter the password, set the name, and click [Continue]
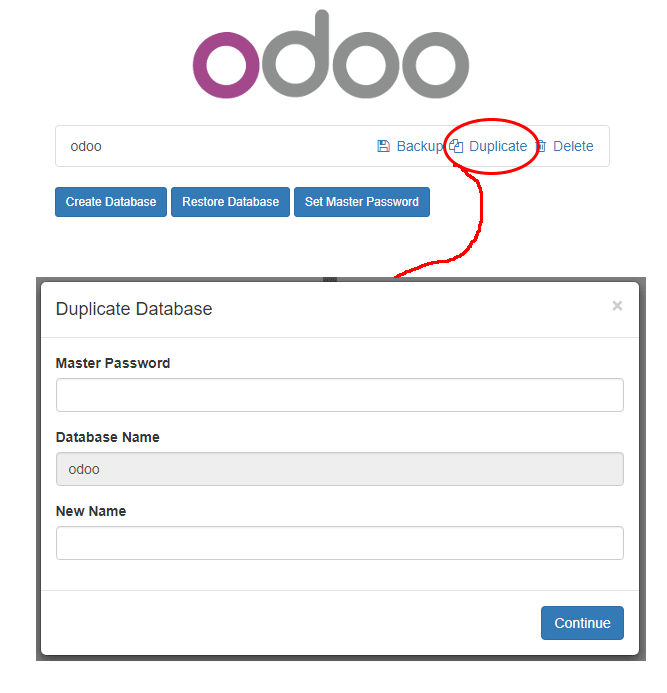
-
After the copy is successful, the database management column will list the newly copied database
delete
Please proceed with caution
recover
After the database is deleted, it can be restored from a backup
-
Enter the password, select the backup file, name the restored database, and click [Continue]
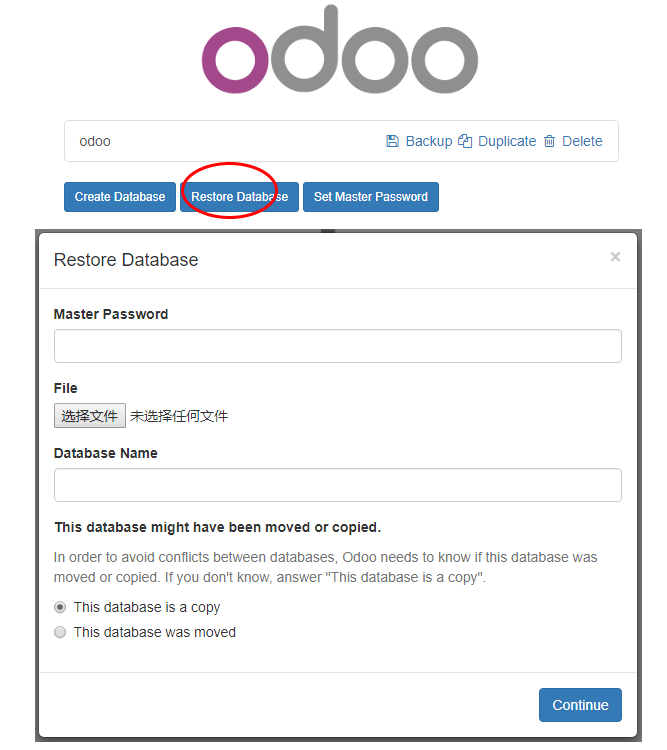
-
"413 Request Entity Too Large" may appear during database recovery. Solution
Modify master password
Changing the master password is a very important security operation.
Basic Settings
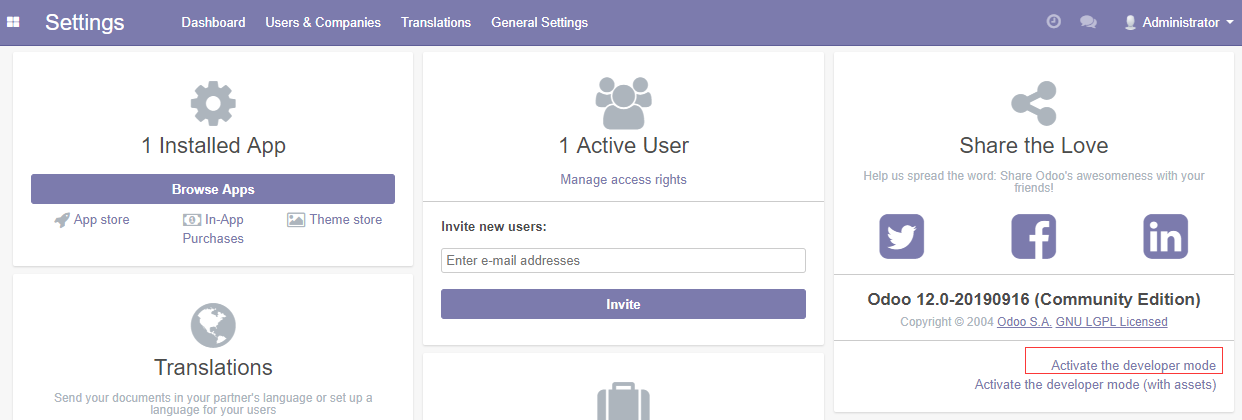
Go to Odoo's Settings panel
- Log in Odoo, and click the Settings icon in the left top menu
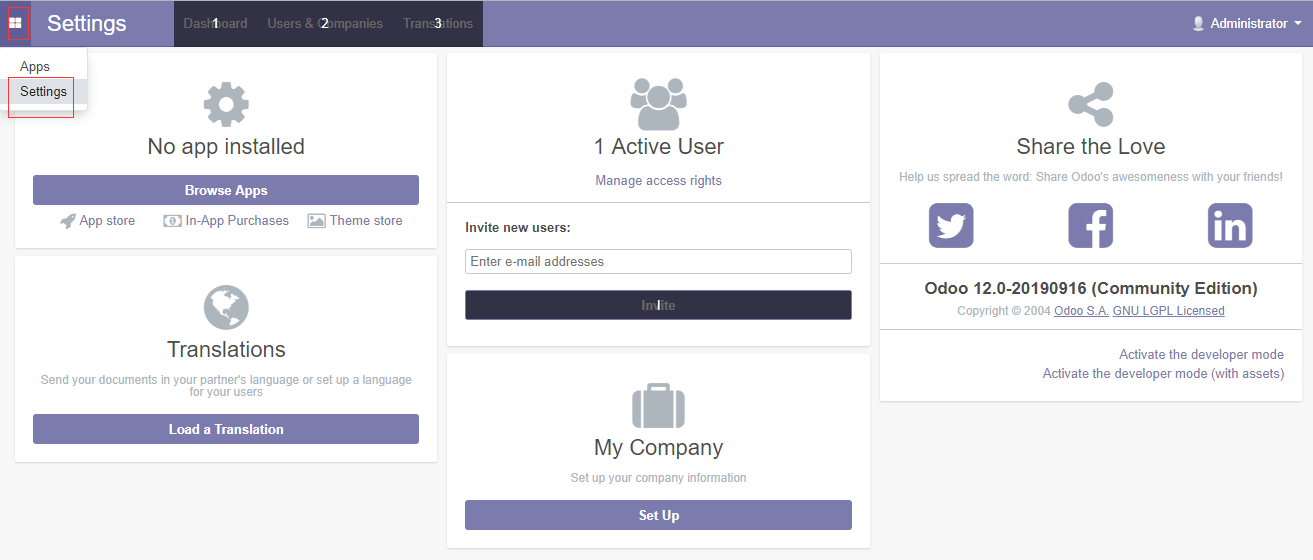
- Then, you can install apps, set language, add user, set up company and more
Set your Logo
 doo 设置logo](https://libs.websoft9.com/Websoft9/DocsPicture/en/odoo/odoo-settingslogo-websoft9.png)
Set Language
- Go to Settings console to add a new language
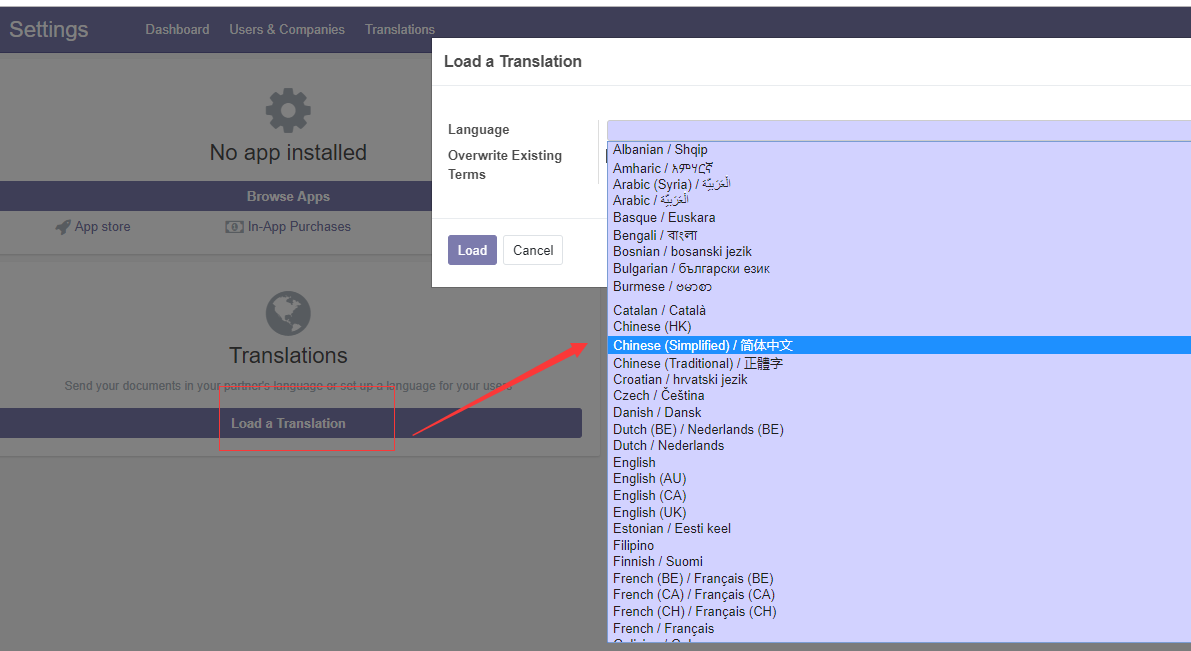
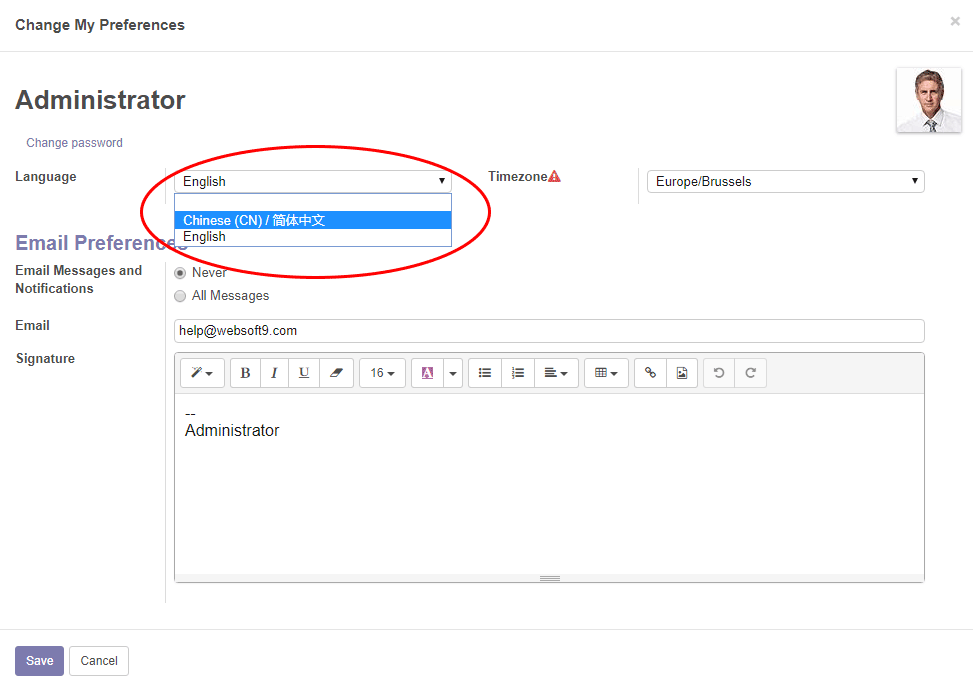
- Then go to Administrator > Prefrences
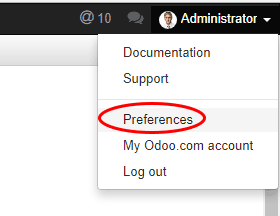
- Set language for administrator
Enable developer mode
- Log in to Odoo, open the Settings item by clicking the settings icon in the upper left corner.
- Click Active the developer mode on the lower right of the Settings screen.
- In the developer mode, the Settings console has more features.
Install wkhtmltopdf
Odoo has installed the wkhtmltopdf, if you want to reintall it, follow is the steps:
-
Remove the old version of wkhtmltopdf
~# sudo apt-get remove wkhtmltopdf
~# sudo apt-get autoremove -
Download wkhtmltopdf tar file from Github
~# wget https://github.com/wkhtmltopdf/wkhtmltopdf/releases/download/0.12.4/wkhtmltox-0.12.4_linux-generic-amd64.tar.xz -
Unzip it and you can find a new folder named wkhtmltox in your Server
~# tar –xf [filename] -
Copy the file wkhtmltox/bin/wkhtmltomage and wkhtmmltox/bin/wkhtmltoodf the directory /usr/bin
~# cp wkhtmltox/bin/wkhtmltoimage /usr/bin/
~# cp wkhtmmltox/bin/wkhtmltoodf /usr/bin/ -
Restart Odoo service
~# systemctl restart odoo
Apps Marketplace
In addition to the base modules, Odoo offers a number of premium third-party modules through Odoo Apps Marketplace
Reference sheet
The below items and General parameter sheet is maybe useful for you manage Odoo
Run docker ps, view all containers when {{trademark}} is running:
CONTAINER ID   IMAGE                   COMMAND                  CREATED         STATUS         PORTS                                                      NAMES
b0755e46fac5   dpage/pgadmin4:latest   "/entrypoint.sh"         2 minutes ago   Up 2 minutes   443/tcp, 0.0.0.0:9090->80/tcp, :::9090->80/tcp             pgadmin
e94cd3f2455b   odoo:15                 "/entrypoint.sh odoo"    2 minutes ago   Up 2 minutes   8071-8072/tcp, 0.0.0.0:9001->8069/tcp, :::9001->8069/tcp   odoo
486284019f46   postgres:14             "docker-entrypoint.s…"   2 minutes ago   Up 2 minutes   0.0.0.0:5432->5432/tcp, :::5432->5432/tcp                  odoo-db
Path
Odoo install directory: /data/apps/odoo
Odoo configure file: /data/apps/odoo/data/odoo_config/odoo.conf
Port
In addition to common ports such as 80, 443, etc., the following ports may be used:
No special port
Version
docker exec -it odoo odoo --version
Service
sudo docker start | stop | restart | status odoo
sudo docker start | stop | restart | status odoo-db
sudo docker start | stop | restart | status pgadmin
CLI
Odoo CLI is a command line tool for managing and configuring Odoo, connect to the server via SSH, run the odoo -h command, and list the available functions as follows.
Options:
  --version             show program's version number and exit
  -h, --help            show this help message and exit

  Common options:
    -c CONFIG, --config=CONFIG
                        specify alternate config file
    -s, --save          save configuration to ~/.odoorc (or to
                        ~/.openerp_serverrc if it exists)
    -i INIT, --init=INIT
                        install one or more modules (comma-separated list, use
                        "all" for all modules), requires -d
    -u UPDATE, --update=UPDATE
                        update one or more modules (comma-separated list, use
                        "all" for all modules). Requires -d.
    --without-demo=WITHOUT_DEMO
                        disable loading demo data for modules to be installed
                        (comma-separated, use "all" for all modules). Requires
                        -d and -i. Default is none
    -P IMPORT_PARTIAL, --import-partial=IMPORT_PARTIAL
                        Use this for big data importation, if it crashes you
                        will be able to continue at the current state. Provide
                        a filename to store intermediate importation states.
    --pidfile=PIDFILE   file where the server pid will be stored
    --addons-path=ADDONS_PATH
                        specify additional addons paths (separated by commas).
    --upgrades-paths=UPGRADES_PATHS
                        specify an additional upgrades path.
    --load=SERVER_WIDE_MODULES
                        Comma-separated list of server-wide modules.
    -D DATA_DIR, --data-dir=DATA_DIR
                        Directory where to store Odoo data

  HTTP Service Configuration:
    --http-interface=HTTP_INTERFACE
                        Listen interface address for HTTP services. Keep empty
                        to listen on all interfaces (0.0.0.0)
    -p PORT, --http-port=PORT
                        Listen port for the main HTTP service
    --longpolling-port=PORT
                        Listen port for the longpolling HTTP service
    --no-http           Disable the HTTP and Longpolling services entirely
    --proxy-mode        Activate reverse proxy WSGI wrappers (headers
                        rewriting) Only enable this when running behind a
                        trusted web proxy!

  Web interface Configuration:
    --db-filter=REGEXP  Regular expressions for filtering available databases
                        for Web UI. The expression can use %d (domain) and %h
                        (host) placeholders.

  Testing Configuration:
    --test-file=TEST_FILE
                        Launch a python test file.
    --test-enable       Enable unit tests.
    --test-tags=TEST_TAGS
                        Comma separated list of spec to filter which tests to
                        execute. Enable unit tests if set.
                        A filter spec has the format:
                        [-][tag][/module][:class][.method]
                        The '-' specifies if we want to include or exclude
                        tests matching this spec.                          The
                        tag will match tags added on a class with a @tagged
                        decorator. By default tag value is 'standard' when not
                        given on include mode. '*' will match all tags. Tag
                        will also match module name (deprecated, use /module)
                        The module, class, and method will respectively match
                        the module name, test class name and test method name.
                        examples: :TestClass.test_func,/test_module,external
    --screencasts=DIR   Screencasts will go in DIR/{db_name}/screencasts. '1'
                        can be used to force the same dir as for screenshots.
    --screenshots=DIR   Screenshots will go in DIR/{db_name}/screenshots.
                        Defaults to /tmp/odoo_tests.

  Logging Configuration:
    --logfile=LOGFILE   file where the server log will be stored
    --syslog            Send the log to the syslog server
    --log-handler=PREFIX:LEVEL
                        setup a handler at LEVEL for a given PREFIX. An empty
                        PREFIX indicates the root logger. This option can be
                        repeated. Example: "odoo.orm:DEBUG" or
                        "werkzeug:CRITICAL" (default: ":INFO")
    --log-request       shortcut for --log-handler=odoo.http.rpc.request:DEBUG
    --log-response      shortcut for --log-
                        handler=odoo.http.rpc.response:DEBUG
    --log-web           shortcut for --log-handler=odoo.http:DEBUG
    --log-sql           shortcut for --log-handler=odoo.sql_db:DEBUG
    --log-db=LOG_DB     Logging database
    --log-db-level=LOG_DB_LEVEL
                        Logging database level
    --log-level=LOG_LEVEL
                        specify the level of the logging. Accepted values:
                        ['info', 'debug_rpc', 'warn', 'test', 'critical',
                        'debug_sql', 'error', 'debug', 'debug_rpc_answer',
                        'notset'].

  SMTP Configuration:
    --email-from=EMAIL_FROM
                        specify the SMTP email address for sending email
    --smtp=SMTP_SERVER  specify the SMTP server for sending email
    --smtp-port=SMTP_PORT
                        specify the SMTP port
    --smtp-ssl          if passed, SMTP connections will be encrypted with SSL
                        (STARTTLS)
    --smtp-user=SMTP_USER
                        specify the SMTP username for sending email
    --smtp-password=SMTP_PASSWORD
                        specify the SMTP password for sending email

  Database related options:
    -d DB_NAME, --database=DB_NAME
                        specify the database name
    -r DB_USER, --db_user=DB_USER
                        specify the database user name
    -w DB_PASSWORD, --db_password=DB_PASSWORD
                        specify the database password
    --pg_path=PG_PATH   specify the pg executable path
    --db_host=DB_HOST   specify the database host
    --db_port=DB_PORT   specify the database port
    --db_sslmode=DB_SSLMODE
                        specify the database ssl connection mode (see
                        PostgreSQL documentation)
    --db_maxconn=DB_MAXCONN
                        specify the maximum number of physical connections to
                        PostgreSQL
    --db-template=DB_TEMPLATE
                        specify a custom database template to create a new
                        database

  Internationalisation options. :
    Use these options to translate Odoo to another language. See i18n
    section of the user manual. Option '-d' is mandatory. Option '-l' is
    mandatory in case of importation

    --load-language=LOAD_LANGUAGE
                        specifies the languages for the translations you want
                        to be loaded
    -l LANGUAGE, --language=LANGUAGE
                        specify the language of the translation file. Use it
                        with --i18n-export or --i18n-import
    --i18n-export=TRANSLATE_OUT
                        export all sentences to be translated to a CSV file, a
                        PO file or a TGZ archive and exit
    --i18n-import=TRANSLATE_IN
                        import a CSV or a PO file with translations and exit.
                        The '-l' option is required.
    --i18n-overwrite    overwrites existing translation terms on updating a
                        module or importing a CSV or a PO file.
    --modules=TRANSLATE_MODULES
                        specify modules to export. Use in combination with
                        --i18n-export

  Security-related options:
    --no-database-list  Disable the ability to obtain or view the list of
                        databases. Also disable access to the database manager
                        and selector, so be sure to set a proper --database
                        parameter first

  Advanced options:
    --dev=DEV_MODE      Enable developer mode. Param: List of options
                        separated by comma. Options : all,
                        [pudb|wdb|ipdb|pdb], reload, qweb, werkzeug, xml
    --shell-interface=SHELL_INTERFACE
                        Specify a preferred REPL to use in shell mode.
                        Supported REPLs are: [ipython|ptpython|bpython|python]
    --stop-after-init   stop the server after its initialization
    --osv-memory-count-limit=OSV_MEMORY_COUNT_LIMIT
                        Force a limit on the maximum number of records kept in
                        the virtual osv_memory tables. The default is False,
                        which means no count-based limit.
    --osv-memory-age-limit=OSV_MEMORY_AGE_LIMIT
                        Force a limit on the maximum age of records kept in
                        the virtual osv_memory tables. This is a decimal value
                        expressed in hours, and the default is 1 hour.
    --max-cron-threads=MAX_CRON_THREADS
                        Maximum number of threads processing concurrently cron
                        jobs (default 2).
    --unaccent          Use the unaccent function provided by the database
                        when available.
    --geoip-db=GEOIP_DATABASE
                        Absolute path to the GeoIP database file.

  Multiprocessing options:
    --workers=WORKERS   Specify the number of workers, 0 disable prefork mode.
    --limit-memory-soft=LIMIT_MEMORY_SOFT
                        Maximum allowed virtual memory per worker, when
                        reached the worker be reset after the current request
                        (default 2048MiB).
    --limit-memory-hard=LIMIT_MEMORY_HARD
                        Maximum allowed virtual memory per worker, when
                        reached, any memory allocation will fail (default
                        2560MiB).
    --limit-time-cpu=LIMIT_TIME_CPU
                        Maximum allowed CPU time per request (default 60).
    --limit-time-real=LIMIT_TIME_REAL
                        Maximum allowed Real time per request (default 120).
    --limit-time-real-cron=LIMIT_TIME_REAL_CRON
                        Maximum allowed Real time per cron job. (default:
                        --limit-time-real). Set to 0 for no limit.
    --limit-request=LIMIT_REQUEST
                        Maximum number of request to be processed per worker
                        (default 8192).
For more details, please refer to the official documentation: Command-line interface: odoo-bin